A recessed screw head is only useful when the seat matches the fastener and the joint still has enough material to carry its load. Review the complete assembly before choosing a counterbore or countersink.
Key takeaways
Match the seat geometry to the specified screw head.
Check remaining material beneath and beside the recess.
Define flushness, depth and inspection on the finished part.
01
The difference is the seating surface
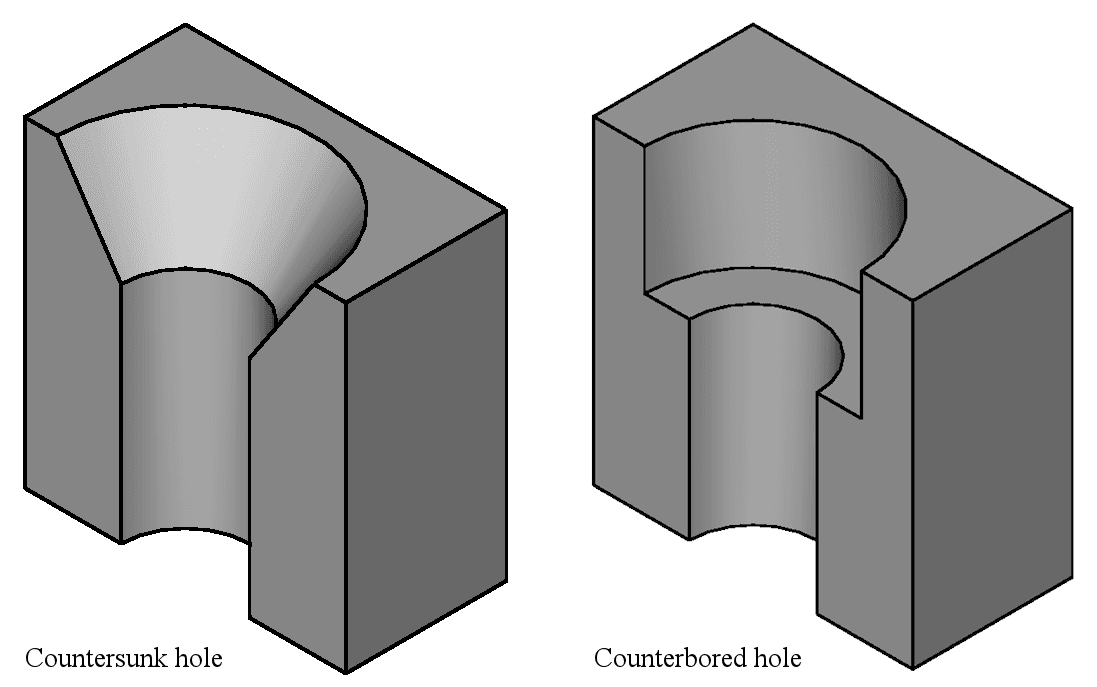
A counterbore enlarges the entrance to a hole with a cylindrical recess and a flat seating surface. A countersink creates a conical seat. The first commonly accommodates a cylindrical screw head; the second accommodates a compatible flat-head screw. Neither feature should be sized from the screw thread diameter alone.
Start with the actual fastener specification, including head dimensions and tolerances. Confirm the access needed to tighten or remove it. A recess may fit the head while leaving too little room for a socket or assembly tool.
02
Compare the requirements before choosing
The correct choice follows the joint layout, not the appearance of the hole in CAD. Use the comparison below to identify information that belongs in the drawing package.
| Decision | Counterbore | Countersink |
|---|---|---|
| Seat shape | Flat bottom with cylindrical wall | Conical surface |
| Key dimensions | Recess diameter and depth | Included angle and major diameter |
| Assembly check | Head and tool clearance | Head angle and flushness |
| Material check | Floor beneath the head | Section remaining around the cone |
03
Control flushness without guessing the angle
A countersunk head may sit above, flush with or below the surrounding surface depending on the seat and fastener geometry. State the intended assembled condition when protrusion could interfere with another component. Do not assume every flat-head screw uses the same included angle.
For a counterbore, define the depth from a clear reference face. Include any washer or other component beneath the head in the stack calculation. A drawing that simply says “recess screw” leaves the supplier to decide which surface controls the assembly.
04
Protect the remaining section
A deeper recess removes material that may be needed for stiffness or clamp-load support. Check the section beneath the seat, the distance to the outside edge and the spacing between neighboring holes. On a thin flange, an otherwise reasonable screw seat may break through or leave a fragile rim.
Review the load path with the design owner before changing the screw type or recess size. A larger head or washer is not automatically a solution if it requires removing even more material. If the available thickness is inadequate, consider revising the joint architecture rather than silently reducing the supporting section.
05
Connect machining and finishing to acceptance
The process needs stable workholding and access to the seat. Features close to a wall or inside a pocket may restrict the cutter or inspection method. Identify any burr-sensitive mating face and agree how the entrance edge will be finished.
Coatings can affect seating and final appearance. Specify whether dimensions apply before or after finishing, and identify masked areas where required. Inspect diameter, depth or angle as appropriate; an assembly check with the nominated fastener can supplement measurements but should not replace specified dimensional evidence.
06
What to send with your RFQ
For example, a cover that slides beneath another component needs a defined maximum screw-head protrusion. Include the mating clearance and the selected screw in the review, rather than asking the manufacturer to infer the acceptable recess from a rendering.
Send MIM Machining the controlled model and drawing, material, quantity and finishing requirements. Mark unresolved fastener or flushness decisions so the quotation can identify assumptions before production.
- Fastener specification and head geometry
- Seat dimensions and reference face
- Required assembled flushness or clearance
- Minimum section or prohibited breakthrough areas
- Inspection records, finish condition and packaging requirements
07
Illustration credit
Cross-section illustration by Waerloeg, released under CC0. The image explains hole geometry and is not a photograph of a customer component.
Frequently asked questions
Questions engineers and buyers ask before quotation.
Can a countersink replace a counterbore?+
Only if the fastener and joint are redesigned or verified for the conical seat. The two seating geometries are not interchangeable.
Does a countersink guarantee a flush screw head?+
No. The seat geometry, head tolerance and assembled stack determine the final height. Specify the acceptable condition.
What dimensions define a counterbore?+
Normally the recess diameter and depth, together with the through-hole size and location. Add surface and geometric controls where the function requires them.

Julie Cai
Project contact connecting international customers with MIM Machining's manufacturing and engineering review team.
Contact Julie